How to paint Moria Goblins
After I painted my first set of 24 goblins I had planned to post a tutorial on how I painted them. I never really got around to it until now. I haven’t done anything special, all the colours and the theme align closely with how Games Workshop paints theirs. I have been noticing that my blog gets a number of hits for “How to paint Moria Goblins,” So clearly people are still looking for a walkthrough, and hopefully this will be useful to you. There are a lot of pictures, I took a photo of every single stage, so this will be really pic heavy. If you feel I skipped over anything or just have questions feel free to drop them in the comments below.
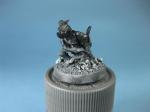
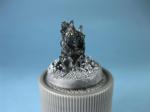
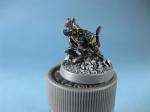
With these goblins I decided to base them before I put the primer on, this is so I can dry brush them first, as when I do it last I always mess up the mini, and I really want to avoid that. So the first photo here has the mini primed and the base hase been drybrushed, but not cleaned up yet. In the second shot I have cleaned the mini up with black paint, ready to go. I next painted the eyes, a mixture of white and yellow, no exact ratio as I change it when I bulk paint so that only a few have the same eye colour. I have painted the eyes now as I wouldn’t be able to get into the helmet later without messing everything up.


In the next shot I clean up all the excess around the eyes, this again is much easier to do now, and then paint a straight line down the eye for the pupil. I use my 000 brush for this part, it takes some patience, but if I mess it up I can always paint over it and try again. Next I did the base coat of the green using Games Workshop Gretchin Green foundation paint. This is a bit early as I would normally do any dry brushing before painting anything else, but again that helmet would give me too much trouble. I am not too worried about getting a good coat on the skin as I will touch this up after the dry brushing, I then cleaned up any over paint with black.

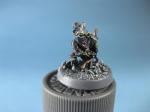
Now we start with the dry brushing, I first put down a coat of Tin Bitz, then Boltgun metal. At the same time I paint the chainmail Boltgun. I don’t worry too much about getting paint on the goblins skin as I will touch that up before too long. I over did the Boltgun Metal, drowning out the Tin Bitz, while I will be able to tone down the Boltgun with washes there isn’t much I can do for the Tin. In the last of the three shots I paint all the leather straps, the bow, and the quiver all Bestial Brown. I will differentiate the wood of the bow from the leather with different highlights later.


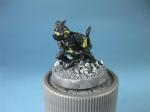
Moving on, I paint the clothes that stick out from under the armour Scab Red, I also paint the part around his neck. I am not sure what that is, but painting it red gives this guy a little more of a punch. The next step I paint the fletching on the arrows Codex Grey, and the shaft black, as well as repaint his gloves black. I then repainted all the flesh with the same foundation Gretchin Green, skipping the face. In the third photo I have applied a wash all over, trying to avoid the eyes. I washed his armour twice to try and correct the Boltgun metal.


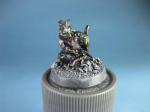
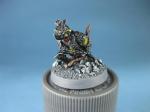
The first shot of these three is just the wash step again, but showing him from the back. The wash I use has semi-gloss paint medium in it, this accounts for the now shiny goblin. Next I work on highlighting the flesh, I start with a little of the base colour to which I have added a touch of Bleached Bone. I also add a drop or two of Matte Medium, this while make the paint slightly translucent, which helps to blend the layers together. This highlight covers all but the darkest recesses and shadows. The next highlight is the same mix I just used with more Bleached Bone and Matte Medium. This time I am just picking out the tops of his ears, and some of his muscles on his arms.


I continue with another highlight again with more Bleached Bone and Matte Medium, adding water as necessary to keep the paint thin. The very last highlight is almost straight Bleached Bone, and I only place a dot on the top of each ear and a tiny line on his arm to try to create some definition. I now move to highlighting the leather, I am again using the base of Scorched Brown mixed with Bleached Bone and Matte Medium. On the straps on his legs this will be the only highlight, where as the quiver will get one more. With the straps I am trying to paint just the edges of each one. I had too much paint on my brush and put down lines that were heavier that I had planned but that is why I started on his legs, I will be more careful when it comes to the strap across his chest.

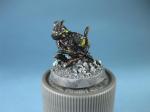

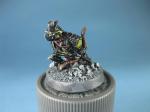
The first photo below is a shot of the leather straps from the front. The next step is the wood of the bow, again starting with Scorched Brown I then add Bestial Brown and the always present Matte Medium. Again I am trying to avoid the darker areas. The next highlight adds Snakebite Leather and Matte Medium. I only have one shot of both those steps, the one in the middle, but I doubt there would have been much of a constrast. The third photo is starting the red, this is the part that really makes these guys jump out at you. The first step is to bring back the original red with Scab red, again I leave the darkest parts untouched.


The next highlight adds Red Gore and Matte Medium. I then add Blood Red to the next highlight. For the last highlight I add a touch of Orange, I used an artist acrylic orange I had from another project. The orange works better than white or pink as I find those, not surprisingly, are too pink. This highlight goes just on the tips and very edges. At this stage I also did the fletching on the arrows, using Codex Grey as a base and then working up using Fortress Grey, which was applied using angled dabs to replicate the look of feathers.
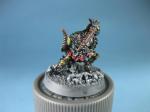


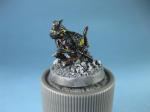
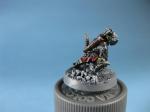
Alright, we are into the home strech now. I use somewhat watered down Codex Grey and paint the some of the edges of his armour. This is to simluate where his armour has taken a hit or been bashed against something and the tarnish has been removed. I suggest starting out sparingly as you can always add some more later. Codex Grey was also used to highlight just a few parts of his hair, a little bit of Fortress Grey was then added to do one more highlight. I then used Codex Grey, with a little more water, to highlight his gloves. The edge of the base then gets a touch up with Codex Grey as well.

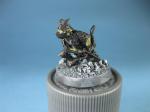
Now all that is left is to clear coat and protect our little friend. I give him two thin coats of Krylon Crystal Clear Acrylic, notice how dark this makes him look. After that has dried I give one coat of Testors Dullcote, and you will notice in the very last shot I wasn’t patient enough and tried to pick him up before the final coat dried and left a big finger print on the base. Always feels good to screw up the final stage of a pretty solid paint job.


So there you have it, a step-by-step painting of a Games Workshop Moria Goblin. To be honest, taking a photo after each step was probably too much, I sometimes had to stare at the image to remember what I did in each step, but I took the photos so might as well use them. Let me know if you have any questions.


Hello there,
I love your goblins.. what material did you use for the basing? Do you have photos taken from before you started painting the model? (from sprue > basing > painting)
January 30, 2015 at 10:25 am
Hi Rubba,
I only have the following photo, from before basing.
The basing material is pretty simple, the rocks are just clay kitty litter and the rest is just simple sand. Both are just glued on with white glue. Then base coated with black, followed by a dry brushing of greys and a tiny bit of white.
February 12, 2015 at 11:10 am