Painting the ONESS Fleet continued
So the next steps were fairly straight-forward, I now needed to paint all the extra panels red. It was fairly easy to identify which panels to do, as they stood out from the rest of the larger panels. For these I used Golden Acrylics, for the basecoat I used C.P. Cadmium Dark Red. I have recently been using quite a number of different products from the local art store, the store is much closer than my nearest GW store, and the prices are unbeatable when compared to GW paints. I will put a post at some point about the different products I am playing around with. So for this fleet it is just the red paints.

So, back to the ships. The difficult part, well actually more time consuming than anything, was getting the sides of each panel. The panels probably average about a millimeter thick, so the sides of each are not too easy to paint. However, it makes a real difference when you look at the ships up close. The photo below is a good example of what I am talking about. I also found that when I was painting the top of the panels I would go over the edge a little anyway, and then they looked quite messy and inconsistent. So this one really was just patience, the trick was to get your brush onto the top of panel and then just roll it down the side at the same time as drawing the brush along the side. In this manner you are painting with the side of the brush not the tip. You will notice that I wasn’t perfect, not an issues as the small mistakes will be covered with the wash, and the bigger ones can be fixed with the original paint.

So after many hours of using very small brushes and almost going blind… I also did all the windows at the same time, in the same manner, but using black.

Next was the wash, very diluted black paint with some acrylic medium, and a drop of future floor polish. Here are before and after photos. To be honest I wish I had made the wash darker, I think these ships, espeically the smaller ones would have benefited from more of a contrast.

Next came the highlighting. This stage took forever, I highlighted each panel twice! The first highlight was the base colour lightened a little, so for the dark grey I added a little of the light grey, and the second highlight had more of the lighter colour. I also used a good amount of acrylic medium, this starts to make the paint a little translucent, which can help with getting everything to work together. When I first started I had a hell of a time painting with the Tamiya paints, they were totally different from anything I had used before. Even though they are acrylic, they are solvent/thinner based, and the thinner evaporated so fast some times the paint on the end of the brush would dry before I even got it to the model. Adding water and additional thinner would just make the pigments clump and make a big mess. The eventual solution was the arcylic matte medium, which is basically arcylic paint without pigment. I would add quite a bit of it to just a few drops of the Tamiya paint, and add a drop of water or two to make it flow better. The end result was much closer to the types of paint I usually use, Citadel or Vallejo.
So here is one of the ships just prior to the highlighting

And after the first highlighting, so the next layer would be brighter and the lines would be thinner. By making the second highlight thinner it give the effect of a bit of a fade at the edges of the panels. The same process was used for all the red panels, with the final highlight using a little bit of orange, to avoid it looking pink.

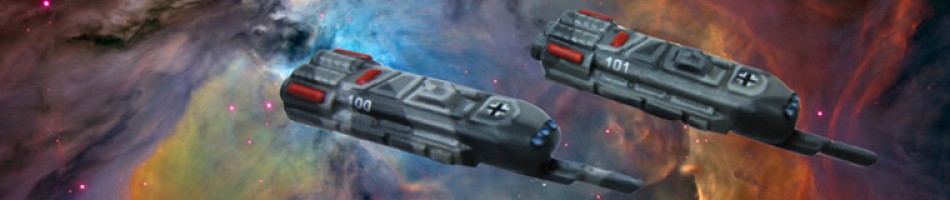
Once all the highlighting was done, I gave all the ships a gloss coat to seal them and prep them for the decals. I bought a whole bunch of different scale decals, 1/72, 1/144, and 1/285, as I didn’t know how they would look until I had them in my hand. I bought most from I-94 Enterprises and Dom’s Decals. So I applied many many decals using Micro Set and Micro Sol decal setting solutions, these are used to get the decals to look painted on. I must say I really like the looks of the numbers, it really gives the fleet a feeling of cohesion, and makes you think there might be a lot more ships out there filling in the rest of the number series. Nearing the end now, I did the jeweling on the windows and painted the engines. Next they got two more thin coats of gloss coat, and then a final two thin coats of dull/matte coat. And then they were finally finished.

Now I will just add some gratuitous close ups, they should help you see all the different highlights. For more check out my flickr page.


Well worth all the effort
inspiring
March 21, 2012 at 5:54 am